Sunday, April 20, 2014

Blogging fell by the wayside as progress progressed


Since my last post, where I made the excuse that teaching about tiny house construction interfered with blogging about it, I’ve made some major changes, including teaching a second semester of construction at my local college, moving my house to a friend’s land to finish building in an idyllic setting, getting my plumbing set up, siding finished, interior painted, floor in, stairs built, cabinets begun, shower set up, tiny wood stove up and running, and more.

Also in the meantime, I’ve lost my outdoor on demand water heater to an extreme freeze (and rerouted my plumbing to make room for an indoor water heater), and rethought my kitchen layout about 5 times.  But, overall, it’s cozy now, and I’m enjoying the little house in a quiet valley in the coast range.


Moving the house – white knuckles: 

Leaving the yard
My dad is a generous guy who says yes when I ask for help, so he agreed to use his truck to help my house make it’s first little trek 25 miles from it’s industrial yard construction zone to another temporary home in a beautiful valley in Mendocino County.  So, we loaded it up, checked the tires and the brakes, and pulled out onto the road.  Plenty of stares from other traffic, and odd encounters along the way, but we made it, no problems, in the 110°F July heat to my new home on a small ranch. 


Cousins?

Arrival!

Friday, September 27, 2013

Teaching Tiny House Classes

This summer I taught a summer course at Mendocino College, and for a couple of days a week for 8 weeks, an eclectic group of locals and not so locals got together and built as much as we could of a new tiny house for the college construction course.

Turns out teaching a tiny house building course takes a fair amount of time.   That said, it's also a lot of fun.  Here are some pics from the class. 
 
Tiny house class day one, getting the trailer prepped for flashing

starting on rim joists with flashing in place
laying out joists for floor

Rough plumbing in, gas and water supply, drain wast vent.  Insulation going down.

Walls going up. After we carried the first wall onto the trailer, we realized it was pretty heavy and sketchy, so we enlisted a passing fork lift for our second wall.
 
rafters are in, sheathing going onto walls and roof.


getting some house wrap on before we end the class


last but not least, some windows..... that's it for Summer 2013 class.   It was a fun adventure, thanks to a great group and to Mendocino College for taking the idea and letting us run.

Monday, June 10, 2013

Front page news.....


 In other news in the tiny house world, there's a chance I'll be teaching a class at the college on building a tiny house this summer.  To get the word out, we've been on the local radio station, and in the local paper, the Ukiah Daily Journal


Sunday, June 2, 2013

Progress, slow and steady into the realm of a more finished tiny home


I know, I've been slacking on the posts.  However, I’ve slowly been plugging away and made significant progress.  Other activities interfered, and I lost a little steam, but I'm back in action.  

Since the last post, I’ve waterproofed the roof, added a stove pipe through the roof, finished insulating,  put up my interior paneling, finished my rough plumbing, added a few extra outlets for posterity, and experimented with some flexible plaster to finish my paneling.  Not one of my interior panels was a complete piece, and every piece required some kind of adjustment, or hole cut in the middle of it.  Of course, it took much longer than anticipated.   The loft is my favorite part so far, with all of the wood finish. I'm looking forward to the rest of the finish work, and the ability to play with making the space seem as large as possible.


Insulation:
I used recycled denim insulation, which is pretty friendly.  But, if I don’t use a mask, I end up with blue snot, so I imagine I also have fine jean fibers in my lungs.  The fun part about the insulation is there is the occasional bit of jean that wasn’t totally ground up, and sometimes a tag or two telling you about the fibers.  Apparently I do have some spandex in my walls.   Gives it a little stretch, right?

Tim Owen-Kennedy of Vital Systems Natural Building turned me on to the insulation, and he accurately described the insulated house as the “blue cocoon.”


Paneling installed in the house, loft flooring in.

The loft is my favorite part so far, with all of the wood finish. I'm looking forward to the rest of the finish work, and the ability to play with making the space seem as large as possible.
For example, insulating and finishing the wheel well.


Shower- covering up my rough plumbing.


I worked with a local sheet metal guy to create a shower stall
that was as simple and roomy as possible.  This is what we came up with.


Roofing:
Turk and Luke from ET Roofing helped put the roof on. Turk is a stickler for details, which is great.  They’ll be coming back soon (I hope) to finish installing the metal roofing. On the left, we were installing the stove pipe through the roof.  


Doors:
Question:  Why didn’t I put in a door months ago?  I love having a door.  Having a door keeps things dry (now that the rains seem to have stopped), allows me to lock up and not move tools into the shop every day, and looks nice.  Again, why didn’t I do this a couple of months ago?  

Electrical: 
The electrical system is officially in... minus the light fixtures, since I still need to paint the interior.  


Haille Paul, local electrician extraordinaire and friend, contorting himself into the electrical closet to finish the junction box.


A happier work position.  We're all set now!  So exciting to finish a task. 

Next time... painting, finish, finish finish!

Tuesday, March 5, 2013

Sheathing, Rough Electric, Plumbing, Windows, Cabinets, and Loft - check (well, mostly check)


February was a busy month, and more progress than writing has taken place.  This is the month where I have to say it takes a village to raise a house.  I gotten a tremendous amount done, and learned new skills thanks to the gracious help of many friends and family members.  A big thanks to all my friends and family!

Finishing sheathing the house
My friend Max spent a couple of days pounding nails for me, while I rushed to close in the house.  We managed to put all the plywood up and Dad helped me wrap the house before the next rainstorm.  Whew.
Max pounding nails


Rough electric
My friend Bret Cooperrider, jack of all trades and master beer brewer, helped me put in my rough electrical work, with some stop in advice from Haille Paul, a friend and local electrician with a background in solar electric.  Haille and I will make the next steps after the roof is on and the electric storage area is complete.  Now I can close in walls and set up my front storage area for a solar system, as well as plug into an existing electrical system.   (I’ll be mudding and taping Bret’s kitchen and sanding his floors next week.)
 

Plumbing
This was a big learning experience, and took some thinking.  I should have set up my drains before I put in the subfloor, but as my friend Steve (the plumber) says… “you carpenters just like to build [things], just bang away and think the plumbing can just fit around it.”  Well, lesson learned, Steve.  I won’t just bang [things] together before putting in the plumbing next time.

I used copper piping because I don’t like drinking out of plastic.  As another friend pointed out, and I thought about as I did the (expensive) copper plumbing, it’s usually plastic piping in most systems, so whatever I plug into for my source…….  Next project, PEX it is.  NO soldering, and probably half to a third the cost.  Easy, too, or so I’ve been told.

Most of the plumbing is in this one wall.  Outside and inside shower manifolds.... and a set up for that tiny sink I'm going to find somewhere that will fit in the shower.
 
In the meantime, I have a great little plumbing system, and am all set up for water and gas (still need to set up the plumbing into the cabinets, and the on demand hot water heater). 


Windows & Cabinets
Got all of my windows in!!  Thanks to the ingenuity and hard work of my cousins, Jason and Shayne Frank, who came up for a work visit all the way from San Diego, my windows are in, and my cabinet frames for the kitchen are built!   

Jason is a professional cabinet maker, and Shayne builds houses as well as being an HVAC expert, and they are both all around highly competent builders.   I had about 4 different window styles, and 6 out of my 10 windows needed flanges attached to them.   It looks great, and it’s warmer inside already.
Jason and Shayne making a cool arched frame for my arched front window
Windows going in

Adding flanges to the arched casement window--- with a blowtorch and screws.
And it's in, after a bit of a struggle.  Looks nice, too.

My kitchen spans my wheel wells, so we had some complex notching to add to the cabinets, and I now have an idea of how to build the rest of my cabinets.


On top of that, Jason has taken some of my dad’s milled California bay and black walnut wood to his shop to build my cabinet doors, so I may head down there shortly and work in a real cabinet shop with amazing fancy tools.   Apparently, he has one saw that responds to verbal cues. 


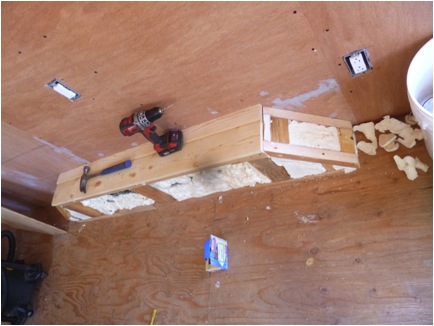
My loft joists are in, but I haven't taken pictures yet.... so here's
a preview of the sanded beams

Loft joists
I have been trying to use low weight materials all along, but my loft rafters, I’m splurging.  I logged and milled some fir rounds with my dad on his property.  They are heavier than 2x4s, but I love how they look.  I even tried to be fancy and notched a log on the end to create an opening to climb up through.  Pictures later.


Insulation
I’m trying out some recycled denim insulation (treated with borates).  It seems to fit nicely into my house, and I’m liking working with a product that, once again, doesn’t make my skin crawl and itch.  I even get the occasional bit of jean poking out of the bats.   I did have blue snot afterwards, and will be using a mask for the rest of the installation.  Pictures to be posted next time.

A plug for small cars 
I wish I had a small truck for this project, but I'm making do with my Toyota Corolla.   I need to ask for help from my truck wielding friends about once a month, and in the meantime,

I have a tool chest,

and a rack that works just fine for most items I need to carry.
Here's my flooring on top of the car.  Mud courtesy of ranch roads.


Sunday, February 3, 2013

Heating the Tiny Home


This question comes up for all tiny home builders.  It doesn’t take much, but it does have to happen.

As I finish up my walls, it’s time to start thinking about interior layout.  I did mock up about 6 different designs already, but none of them really make sense now that my house is becoming a reality.  I’ve made a lot of adjustments to my original plans, because of my window selection as well as other materials that I’ve been coming across. 

It’s decision time for gas lines, water lines, lights and outlets, and, not least of the decisions, how to heat.  It’s mild here in Mendocino County, with freezing days and nights in the winter, but overall, not bad.   Summers can be hot (many summer days over 100), but summer nights cool off, and some shade can make the day just fine.  Like they say, it’s a dry heat.   Most people in the north coast range don’t have AC.   But everyone has heat.  Not sure if I’m staying here, but do want to stay in this climate.

This means I have to plan for heat.   There are about 5 attractive choices that I’ve come across.

  1. The fancy Dickenson Newport P-9000 Propane Heater that Tumbleweed uses in their homes.  Advantage:  It’s small, sleek, and can fit in small spaces.  Disadvantage:  I can readily find wood to burn, and would have to purchase propane for heat.  Propane burns cleaner than wood, but I’m not sure what other impacts it might have.  Have to investigate. 


Cool tiny wood stoves designed for camping or boats:

2.    The Hobbit (made in the UK by Salamander Stoves).  I’ve seen one in a tiny house and it was pretty cool, as well as being among the cheapest small cast iron stove I’ve encountered). 

3.  Shipmate stoves.  Beautiful and pricey.  

4. The Sardine from Navigator Stove Works is in the middle price range, and comes highly recommended.  

5.  Last, but not least, are the rolled iron stoves built in MN for canvas tent camping by a company called Four Dog Stove.  By far the cheapest, probably because they aren’t cast iron, but also light and moveable.  However, a little longer than I was hoping for.    I’m leaning toward the smallest of the lot, the Two Dog Stove.    Price is right, it can be moved out easily in the summer, and you can add a water tank to the side, and cook on top.    Another tiny home owner uses one and it seems to be enough for her. 

I’m open to other suggestions and thoughts……. Anyone?  

Closing in my frame


I’ve been adding rafters, blocking, and odds and ends for the last couple of weeks, with a couple of pieces of plywood nailed to the side of my house like an embarrassing unfinished haircut.  While I know where my time has gone (piddley little details that you will never be able to see, but have to be taken care of), it doesn’t look like much has changed. 

- Until the last couple of days, when I got plywood on the roof, and started on the plywood for the sheer walls again.  Now, I can start to feel like there’s progress.  And get a sense of how the space will feel as it closes in. 

Never mind the compounding mistakes that I encounter.  I think all projects have them, and lucky for me, 1) wood is forgiving, and 2) I will be the person who lives with any weirdness I create. 

I’ve been lucky to get help at opportune moments, and can always beg my dad to stop by to help me throw plywood onto the roof with me so I don’t fall off the ladder and break my neck all by myself.    

Doug, who is working on his 1960 something GMC truck in the shop yard, and Richard and Nate, who have their electrical business storage on site, come by to heckle/advise/conversate me on a regular basis.    

Pictures of progress:


I’ve been working on rough plumbing with my friend and neighbor, Steve Henderson.  I should be starting my rough electric next week in between bouts of finishing up the plywood and getting going on roofing.  

Steve's dog Bailey is actually a plumber's
 helper. She carries parts to Steve when he's
working under houses.  


Front end closed in with plywood, plywood over most of the roof.
Buddy, the yard dog, cruises by to gently observe every hour.  For a big Rottweiler mutt yard dog, he’s not very intimidating.   He’s more interested in whether I have a tasty lunch.