Sunday, February 3, 2013

Heating the Tiny Home


This question comes up for all tiny home builders.  It doesn’t take much, but it does have to happen.

As I finish up my walls, it’s time to start thinking about interior layout.  I did mock up about 6 different designs already, but none of them really make sense now that my house is becoming a reality.  I’ve made a lot of adjustments to my original plans, because of my window selection as well as other materials that I’ve been coming across. 

It’s decision time for gas lines, water lines, lights and outlets, and, not least of the decisions, how to heat.  It’s mild here in Mendocino County, with freezing days and nights in the winter, but overall, not bad.   Summers can be hot (many summer days over 100), but summer nights cool off, and some shade can make the day just fine.  Like they say, it’s a dry heat.   Most people in the north coast range don’t have AC.   But everyone has heat.  Not sure if I’m staying here, but do want to stay in this climate.

This means I have to plan for heat.   There are about 5 attractive choices that I’ve come across.

  1. The fancy Dickenson Newport P-9000 Propane Heater that Tumbleweed uses in their homes.  Advantage:  It’s small, sleek, and can fit in small spaces.  Disadvantage:  I can readily find wood to burn, and would have to purchase propane for heat.  Propane burns cleaner than wood, but I’m not sure what other impacts it might have.  Have to investigate. 


Cool tiny wood stoves designed for camping or boats:

2.    The Hobbit (made in the UK by Salamander Stoves).  I’ve seen one in a tiny house and it was pretty cool, as well as being among the cheapest small cast iron stove I’ve encountered). 

3.  Shipmate stoves.  Beautiful and pricey.  

4. The Sardine from Navigator Stove Works is in the middle price range, and comes highly recommended.  

5.  Last, but not least, are the rolled iron stoves built in MN for canvas tent camping by a company called Four Dog Stove.  By far the cheapest, probably because they aren’t cast iron, but also light and moveable.  However, a little longer than I was hoping for.    I’m leaning toward the smallest of the lot, the Two Dog Stove.    Price is right, it can be moved out easily in the summer, and you can add a water tank to the side, and cook on top.    Another tiny home owner uses one and it seems to be enough for her. 

I’m open to other suggestions and thoughts……. Anyone?  

Closing in my frame


I’ve been adding rafters, blocking, and odds and ends for the last couple of weeks, with a couple of pieces of plywood nailed to the side of my house like an embarrassing unfinished haircut.  While I know where my time has gone (piddley little details that you will never be able to see, but have to be taken care of), it doesn’t look like much has changed. 

- Until the last couple of days, when I got plywood on the roof, and started on the plywood for the sheer walls again.  Now, I can start to feel like there’s progress.  And get a sense of how the space will feel as it closes in. 

Never mind the compounding mistakes that I encounter.  I think all projects have them, and lucky for me, 1) wood is forgiving, and 2) I will be the person who lives with any weirdness I create. 

I’ve been lucky to get help at opportune moments, and can always beg my dad to stop by to help me throw plywood onto the roof with me so I don’t fall off the ladder and break my neck all by myself.    

Doug, who is working on his 1960 something GMC truck in the shop yard, and Richard and Nate, who have their electrical business storage on site, come by to heckle/advise/conversate me on a regular basis.    

Pictures of progress:


I’ve been working on rough plumbing with my friend and neighbor, Steve Henderson.  I should be starting my rough electric next week in between bouts of finishing up the plywood and getting going on roofing.  

Steve's dog Bailey is actually a plumber's
 helper. She carries parts to Steve when he's
working under houses.  


Front end closed in with plywood, plywood over most of the roof.
Buddy, the yard dog, cruises by to gently observe every hour.  For a big Rottweiler mutt yard dog, he’s not very intimidating.   He’s more interested in whether I have a tasty lunch. 


Wednesday, January 23, 2013

Framing the walls


The challenge of the week has been putting my odd windows that I found in various shops into my existing plans.  While I really like many of them, some of them have to be left out due to overenthusiastic procurement.  Sigh. 

Last week I laid out my walls, and this weekend my friend Wendy, an experienced builder, and Max, a young friend willing to try anything, helped me put up my frame.  With rain in the forecast for tomorrow, I will be working on getting the house covered tonight.  I should be sheathed in by next week, and water-resistant, but until then, it's a little stressful.
Trailer with sub floor down under the tent
moved outside to build the walls, since the tent was too short 
first wall framed up


bracing the first long wall
building the second long wall
tada!


Tuesday, January 22, 2013

Logging and milling wood for the house

I had a bit of a break during the holidays while I searched for windows and doors, so we did some logging and milled wood for the house. 

the details
My dad’s home is on an old cattle and sheep ranch in Northern California.  When the land was occupied by native Californians, they managed their land for oak abundance, and acorns were a staple food.  The Masut, Yuki and Pomo tribes in the region burned the land regularly to prevent the Douglas firs from dominating the forests, to reduce the risk of larger fires, and to promote native bunch grasses and other useful plant abundance.  In the mid 1800’s settlers from the US came in and began logging, and grazing cattle and sheep.  At first, some of the new settlers continued the controlled burn tradition, but as the native population was increasingly pushed off of the land (euphemistically put), more large ranches were established, and the tradition was abandoned.  The 20th century practice of intensive fire suppression decreased fire frequency in the region considerably, as Americans came to view fire as an enemy of forests.  For a good read on how fire suppression really came into play in our forests, check out Timothy Egan's book, the Big Burn.

In the 1960s, shortly before the ranch was subdivided into smaller properties, my father's property was logged extensively.  When we arrived in 1976, the large firs had been largely removed, and young ones were sprouting up everywhere. The big old oaks still dominated our north slope home, but in the last 40 years, the Doug firs have taken over the forest.  My father has been thinning them for firewood, milling, and just taking out the little ones, but it’s a large task.    There are thousands of fir saplings, and hundreds upon hundreds of 30-60 year old trees where there used to be widely spaced large firs.

Small preventative fires for the last 100 years would have been more effective at killing the small trees before they were established.  Now, the forest is thick with small firs, and there are large thickets of saplings that will act as a fuel ladder to the upper canopy in a fire, risking a much larger conflagration.  It’s not easy to manage with fire anymore. 

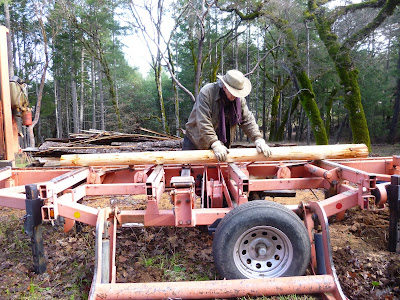
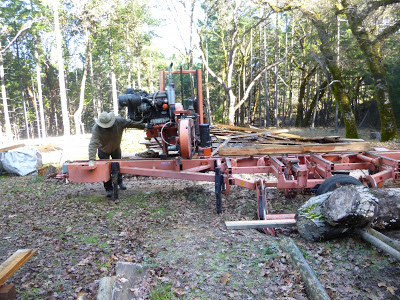
The long and short of it (for this story) is that there’re plenty of small fir trees for me cut down for wood.  A couple of weeks ago we went and took a few down, and I peeled the bark from the logs, and we milled up half rounds for my loft rafter

This tree is a bit bigger than most of the ones you would want to thin out, but was damaged a few years ago by bulldozers cutting a fire line around the house (the fires came within 1/2 miles from the door)
Using the "mule" to drag logs to the mill site
Since I want to use these logs as half rounds for my loft rafters, I peeled them before milling them to size.

Rafter logs peeled and ready to mill
Dad getting the log set to mill


Milling up a 4 by 4 with extra logs

. 


Unfortunately, I can’t mill all of my wood for the house this way, much as I’d like to, because the wood would require time in a kiln, or time to dry and season so it wouldn’t twist as it dried in my house, warping my frame.    Next time!


Monday, December 24, 2012

Tiny home for me - Large, excellent home for rodents


I recently insulated my sub floor with wool insulation from Oregon Shepherd, added some rice hulls to absorb moisture, and realized I’d made a rodent’s dream nest.  I mean, really, what more would they ask for in a nest?   Warm, dry, cozy… 

I’m not 100% sure that the wool insulation will work as well as some of the more engineered products, but have my fingers crossed.  I loved putting in insulation that I could handle without a mask and gloves, and I really enjoyed not having to worry at all about toxicity.  The larger environmental question comparing grazing, feed and water to synthetics and toxics would require some lengthy, complex assessments, but I suspect that comparisons of life cycle impacts and benefits of the various kinds of insulation would provide some good arguments for using wool. 
My dad helping to spread the wool out into the floor bays.


Could it look any more homey for the average rodent?


With cloth over it to keep the insulation from blowing away while I cut the plywood for the floor.


I’ve since put a layer of plywood over it, which should keep those rodents out, but it’s been raining like crazy here. This has limited my time working on the project and next steps.  Hoping for clear weather soon.   In the meantime, I’ll be shopping for windows and doors.


Visiting other tiny homes in various stages of construction.

Colin’s place:  A friend of a friend recently completed his tiny home and moved it out to beautiful Inverness Park, a tiny town near Point Reyes CA. He let me stop by, pick his brains for a couple of hours on details, and take photos.  Colin chose a fairly simple structural design, and decided to spend his time on beautiful woodwork details. He spent a lot of time on salvage, and ended up with great wood for his siding, interiors, and floors as well as some very nice windows and doors.  He also built his cabinets, furniture and ladder-shelf himself, using recycled redwood, cedar, and Douglas fir, among others.  His two solar panels can run his appliances for up to 5 days without sun, and his cool little Hobbit stove keeps the place toasty.  Awesome little home.  I hope I build something as nice to be in.    


I stopped by a couple of weeks ago to check up on friends at the Boneyard Studios.  They’ve been plugging away at their three tiny houses since this summer, and were recently written up in the Washington Post.  What’s great about their site is that they are trying three very different designs, and sharing what they learn while they go.  They're also experimenting with different siding, sealants, attachment to frame, and much, much more.  Everyone has progressed rapidly since this photo was taken, so check out their blog for more recent photos.

Jay built a standard wood frame (house on right), but has gone with a very boxy design to fit his modern sensibilities.  For more details, and some fun construction time lapse videos, check out his blog on the Matchbox. 

Brian decided he’s okay with a wide load (middle house), and extended his prefab SIPs panel home (which he designed with engineers and architects) out to 11 feet.  This gives him a bit more breathing room, and less of a long narrow feel.  For more details, including his cost estimates for the curious, check out Minim House.

Lee’s gone with the dormer look, after extensively modifying a tiny house started by someone else (on left).  Who knew you could buy a tiny house shell on craigslist?  She and her building experts have taken that shell and modified it almost beyond recognition. 


Tuesday, November 27, 2012

Do 3.5 inches matter?


It’s been a few weeks, and my trailer has arrived.  It’s of course taken longer than expected, with truck repairs and holidays getting in the way of prompt initiation of work.   I ended up opting for a design used by another tiny home builder who had purchased a trailer from the same dealer.   (By the way, not only does my sister know my tiny home compatriot and trailer designer, Colin, but he also built his house at another friend’s shop.  Very helpful guy) 

I wasn’t exactly sure how it would turn out, and hoped for the best.  It’s sturdy and clean looking.  The drop axles may make it hard to take the trailer over big bumps, but lower the bed by about 4 inches, which will allow me to sit up in my loft bed.  Otherwise, it’s a pretty standard flatbed with extensions on the side.  
tada!


My friends at Vital Systems Natural Building & Design are generously letting me occupy a covered space in their yard for the duration of the build, so here's the trailer at the shop, loaded down with materials for the framing and sheathing.   I can't thank them enough for a roof over my head, with electricity to boot.  Makes my life a lot easier.


But the question at hand (Do 3.5 inches matter?) really comes down to the age-old battle between the simple, affordable, and lean options, or complex, more time consuming/expensive, but potentially improved options.   My three constraints are weight, size, and budget, all of which leave room for a great deal of creativity.  

Since I know about 20 builders and plumbers and electricians, added to the natural building guys, everyone, including my cousins, is now giving me great additional design ideas, better material suggestions, and more storage space options.  All of which entail more $$ and/or time, but could really add to the functionality of the home.   The question of the week is, do 3.5 inches in floor height and about 10 fewer joists make a big difference in the long run?  The max height of the house is 13.5 feet, so every inch in floor height takes an inch away from the loft head room.  Every extra piece of wood adds to the total weight of the house, also a limited resource.

Here’s the logistics:  I laid out a sub floor to support my joists for the real floor on top of the trailer ribs (see picture below).  The only reason to add a floor above the current trailer bed is to make room for floor insulation.  This is actually important to do, even in the milder climes of the California Coast Range.

HOWEVER, as Tony from Vital Systems pointed out, there’s room under those flat boards to create a sub floor cavity for insulation.   The draw back:  complex, and could take me a few days to work it out, and includes a lot more drilling into the frame.  The benefit:  I get 3.5 more inches in height to play with, and the trailer’s a bit lighter.  Not much, but some.


After bolting down the “sub floor” to the angle iron, I’m not so excited about putting 50 more holes in even thicker steel of the trailer frame.  Framing out the floor on top of the trailer bed would take me a day.  The other option, who knows, with all the special cuts and crawling around under the trailer.  Then there's the plumbing to think about.  Would there still be room for it?  ARGH, decisions.  


Tuesday, October 16, 2012

Shopping for trailers


It helps not to be the first person to try something new.  There a few tiny house bloggers and companies out there that have trailer advice (like Tiny r(E)volution, and Portland Alternative Dwellings’ book, Go House Go!).  On top of all this advice, every trailer dealer I went to this week has sold trailers for tiny-home builders.  They each had their opinions and pieces of advice.  It sounds like it won’t be a problem to get the “right” trailer. It just might take a few weeks, and I have to decide which advice to follow.   

What kind of trailer to buy for a Tiny House” and “How to determine trailer weight for your tiny house,” from Tiny r(E)volution, recommend a flatbed with at least a 7,000 lb GVWR (gross vehicle weight rating, or the total weight capacity of the trailer, including the trailer, and its load).  Their estimate is that the house weighs about 6,000 lbs.  My completely uninformed guess is that mine might weigh more.  All I know is that I recently shipped most of my books, gear, clothes, etc. on Amtrak, and they weighed 1,300 lbs.  A small house has to weigh more than 6 times the weight of my belongings, right?  Even if I do own more books than most people.

Other sites recommend looking for a trailer with a 14,000 lb GVWR, but according to the dealers I visited, tiny home builders purchasing their trailers have used 10,000 lb GVWR trailers.  The extra beefy 14,000 lb GBWR trailers require a commercial drivers license, and add about $1,000 to the price tag. 

Some people have even refurbished old travel trailers, which I’ve found online for as low as $375.  They do end up putting a lot of work into them, and I think I would need to hire a welder to shore it up, which could add at least $1,000.  Still cheaper, but this is the foundation for a house, right?  You want to make sure that a trailer is sturdy enough, and I’m concerned that a used trailer is a bit of a gamble.  There’s a balance between trying to build a house with as much salvage as possible, and skimping on safety.

All that said, I think I found a place that will build a trailer for me for about $3,500.  I need to make a couple choices, about length, and whether or not to go with drop axles, but hope to get an order in tomorrow.  


The new trailer will look a bit like this, but longer and wider, with no bumpers, and no wood on the deck.  Basically bare bones.


Side note:
On the latest trailer shopping trip in Sonoma County I ended up running into a few nice surprises.   Sonoma County (and Mendocino) seem to be a hotbed of small to tiny homes.  Check out some of the houses we encountered.           
An office / coffee shack on the side of the road in Hopland, CA.

A tiny house company in Petaluma,
with a couple of their projects on display.


Their model office space/spare room.

A tiny house on display at a trailer dealer’s…. apparently one of their experiments.